Showing posts with label recipes. Show all posts

Thursday, December 29, 2016

breakfast made easy!


Well it's that time of the year again - that time when you take stock of the year behind you (and while personally I can't say that 2016 was especially bad for me, I think we can all agree that its merits were questionable overall). Enough said on that subject.

In better news, the start of a new year is traditionally the jumping off point for a fresh start - and for SO many of us, that means re-evaluating your eating habits, and trying to shed pounds put on over the holiday season - or in some cases, over several years.

Full disclosure - back in June of 2016, I re-joined Weight Watchers - (for what I believe was maybe the 4th go-round for me).  While I probably carried it fairly well, I knew I had an extra 25-30 lbs. that weren't doing me any favours - from both a cosmetic AND a health standpoint.  So one fine June morning, I walked into my local WW location, and said "sign me up!" (again!)

I'm pleased to say that since June, thanks entirely to following the WW program, I've shed about 10 lbs., increasing my level of daily activity in the process, going down a size, and just feeling better overall.  I'm NOT so pleased to say that for the past month or so however, I've fallen off the wagon somewhat. :(  Totally my fault - I think in my case, because I didn't have THAT much to lose, I was fairly satisfied with my 10 lb. loss, and my motivation to lose more started to wane.

Aaaaaaaaaaaanyhooooo.....all that to say that Weight Watchers has a fantastic new program since I'd last joined - their more holistic "Beyond the Scale" program still uses their familiar point-counting system - but the items that have points have changed.  For instance, the vast majority of fruits and veggies count as 0 points - so you're encouraged to load your plates with them, and keep the higher-point items to a minimum.  You're allotted a weekly amount of points (plus a few extra for good measure) - and if you track your daily & weekly points, you should gradually lose weight.  It's that easy, and it works!

While I don't think I'm going to go all out and blog full-time about my progress, you may still see posts here from time to time documenting my WW experience, and offering some tips, tricks, and recipes along the way. Circling back to the beginning of this post, I believe the time has come for me to get serious about finally reaching my goal weight and becoming a lifetime WW member.  So here I go again!  Today, I'm starting off with something quick and easy, while showcasing an inexpensive little kitchen appliance that I love!

Who doesn't love a good breakfast sandwich? And contrary to the fact that the world's biggest fast-food chain popularized them, they're not really that unhealthy a choice. They're easy to make, easy to transport, and yummy to eat.  Now, of course you can make them the traditional way - toast an English muffin, fry an egg, add toppings of your choice - OR - you can invest less than $30 and use the Hamilton Beach Breakfast Sandwich Maker:


This little beauty puts it all together for you in less than 5 minutes, and has you walking out the door with a restaurant quality (perhaps better than!) breakfast sandwich in hand. You start by heating up your machine until the "ready" light glows green, then adding your ingredients to the top and bottom rings (in my case, English muffin, shredded cheese, and ham slice on the bottom; cracked egg and English muffin on the top).


In a about 4-5 minutes, you've got this little beauty:


Every ingredient cooked/toasted to perfection!  You can also add other toppings of your choice after it's done should you choose (i.e. tomato/lettuce/avocado) - and you're not limited to English muffins either - you can use croissants, bagels, or any other type of bread product you can fit into the ring. And for all you WW points counters out there, the sandwich as I prepared it is a very manageable 8-point breakfast:

English muffin: 4 points
2 tbsp. shredded cheese: 1 point
1 slice ham: 1/2 to 1 point
1 large egg: 2 points
TOTAL: 8 smart points

So, let's all sit down and tuck into 2017!  My very best to you all for a happy and healthy new year!


Saturday, February 6, 2016

clean the fridge bluepplesauce


Okay.  So I could have called it apple-berry sauce, or berry-applesauce - but bluepplesauce just sounds a lot more fun, don't you think? :)

Anyway - yay!  The weekend is here!  We all wait for these glorious two days where we don't have to get up at an ungodly hour, and trudge our way to our commuter train in the cold and dark for five days in a row, only to come home at night, hunker down to bed, and get up and do it all over again.  (Ummmmm....okay, maybe that's just me, but you get the picture).  Bottom line is, we look forward to time to ourselves so we can do fun things like - clean out our fridges!

Which is what I did this lovely Saturday morning - and in the course of emptying my crisper bins of all manner of science experiments (but responsibly donating them to my green bin!) I discovered I had a pile of apples and a box of blueberries that were on the edge of no return.  There was no way I was going to eat them all today - but what to do, what to do? 

BLUEPPLESAUCE people. 

Now, there are a few different ways to make applesauce - in the past my go-to method has been to chop up some apples, throw them in a pot with a bit of water and simmer them down until they soften - but today, I decided to try another method, from the pages of Meghan Telpner's awesome Undiet Cookbook (page 204 to be exact). Some of you may recall that I played a small part in helping Meghan create this cookbook, which you can read about here - and I've been far too late in mentioning that this gorgeous cookbook was published last fall to (deservedly) great success and rave reviews, and just go buy it, okay? :)

So here's how I did it today - SO quick and easy!

Start by peeling and coring your apples: 


I used about 7 apples of varying sizes and types (some honeycrisp, one mac, and one gala to be exact), because that's what was rattling around in my crisper bin - but of course you can use whatever type you like. A tip - "coring" to me always sounds like a lot of work that you'll need a special tool for - but I simply peel the apple, then cut away the sides of the apple from around the core. Cored!  

From there, I chopped the apples into small chunks, and placed them in a steamer basket with the blueberries (I used a full 6 oz. container of blueberries), over about 2 inches of water:


You can add any fruit that lends itself well to steaming to this mixture - but I had blueberries on hand, so that's what I used.  Cover, and steam for 10 minutes.  While your fruit is steaming, easy peasy lemon squeezy yourself 2 tbsp. of lemon juice:

BEST lemon juicer ever from IKEA
After steaming, you'll end up with something that looks like this:

From here, there are a few things you can do to get saucy with your steamed fruit: a) transfer it to a mixing bowl and mash it up for a rustic sauce, b) transfer to a food processor and let it fly, or c) do as I did, and transfer to a blender: 


(Not the sharpest photo, but aren't those colours pretty?)  Add your lemon juice to the blender with the fruit - and I also opted to add some cinnamon to taste:


And blend away! I believe any blender will do the trick, because after 10 minutes of steaming this fruit is pretty mushy - but if you're using a high speed blender such as a Vitamix (as I did), you DO NOT need to spend a lot of time blending this - I think I gave it a few seconds at low speed at most.

Et voila!  I give you bluepplesauce!!


While the colour is definitely influenced by the addition of the blueberries, the flavour remains decidedly applely (?)... but overall, tart, delicious, and not a drop of artificial flavour or sweeteners!  (And of course I know I don't need to remind you that blueberries are a fine source of antioxidants) :) 

So the next time you're cleaning out the fridge, think twice about tossing those almost past-their-prime fruits - there's a sauce of some kind just begging to be made with them! (strawpplesauce anyone?) :)

Monday, September 8, 2014

get fresh in the kitchen!


Happy Monday, all!

It is an honour and a privilege to share this exciting news!  If you're familiar with my blog, you'll likely know that I'm a graduate of Meghan Telpner's Academy of Culinary Nutrition.  Well, my fellow graduates have put together an amazing collection of recipes in an eCookbook - that I have made a VERY small contribution to. (In fact, my contribution - a recipe for roasted brussels sprouts, can be found here on the blog).

But please - don't let that stop you from checking out the rest of the recipes in this awesome, inspired, collection of quick, easy, delicious, and best of all, NUTRITIOUS recipes - and I'm not just saying that because I'm involved - honestly, I would buy this book myself (if I didn't have access to a free copy as a contributor!) :)

There is truly something here for everyone - Over 60 recipes, containing gluten free, dairy free, nut free, and egg free options, as well as vegetarian and vegan offerings - from breakfast to snacks, and everything in between.  And best of all, the first 50 copies are being offered at $4.75 - that's a  75% discount!! Yaaaaaayyy!!! :)  To download your copy of GFITK and take advantage of the discount, simply click here, then type in this discount code:

GETFRESH14

(You can also click on the button in the sidebar to purchase).  The discount is only being offered until October 15, 2014, so if you're interested, now is the time!  Again, I'm very proud to be associated in my own small way with this book - most of the work was done behind the scenes by fellow ACN grad and fitness and nutrition coach Michelle Vodrazka.  Please take a moment to check out her website Inspired Bodies for more inspiration (and cookbooks!) :)

Have a lovely week, friends!  :)

Tuesday, September 2, 2014

summer, we hardly knew ye... { and a frittata recipe! }

Late summer sunset - Nobel, Ontario
Well, that was quick.  Summer, that is.  In fact, I feel like I'm still waiting for it to start...for that day where we say, "Okay, that's more like it!  Summer is finally here!"  Oh, we had a scattering of those super sweltering, sticky days this summer, but nothing like summers past where you actually complain about the weather being TOO. DAMN. HOT.  At least, that's how it was in my part of the world - and now...Labour Day weekend, 2014, is history. Seriously, where did the time go?

Well, in my case, I worked my way through most of the summer - putting off some extended time off until (hopefully) the new year, when, if things go according to plan,  we may be fortunate enough to make a winter escape to a Caribbean beach somewhere.  That said, it wasn't ALL work, work, work this summer...on the days I did have off, I managed to make the most of them - and thought I'd put together a little retrospective, to remind myself, (if no one else), that the summer of 2014 actually did happen... :)

There were quite a few lovely trips to nearby Niagara Wine Country:

An inviting back porch at Featherstone Winery
My favourite of all - The Good Earth! 

A gorgeous view of Lake Ontario from the Mike Weir Winery
Some memorable bike rides with Rob:

Our first of the season, just weeks after the snow left, near Welland, Ontario

An evening bike ride close to home in Port Credit, Mississauga
Along the banks of the Niagara River, near Chippawa, Ontario
I headed to downtown Toronto a few times, once for the AWESOME gay pride parade - this year Toronto hosted the World Pride event at the end of June:


And another evening in the city with my daughter during the Toronto Jazz Festival:

The reflecting pond in front of Toronto City Hall (not pictured - that's the Old City Hall in the background)
A mini-vacay to Letchworth State Park in Western New York, (which I wrote about here):

The Glen Iris Inn at Letchworth State Park, New York
Lower Falls footbridge, Letchworth State Park
What's summer without an outdoor concert?  We thoroughly enjoyed James Taylor at Toronto's Molson Amphitheatre:


We attended two antique boat shows in Ontario cottage country, and had STELLAR weather at both:

The Antique and Classic Boat Show, Gravenhurst, Ontario.  Note the two historic steamships, the RMS Segwun and Wenonah II in the backgroud - available for sightseeing and dinner! 
Muskoka Lakes Association Antique Boat Show, Port Carling, Ontario
Had a lovely tour of Georgian Bay's 30,000 Islands on the Island Queen, out of Parry Sound, Ontario, (which I wrote about here):


We spent a lovely sunny summer Sunday at Turkey Point beach on Lake Erie, Ontario:

What's SUP? ;-) 

Why does this remind of a scene from Jaws...?
And enjoyed several kayak/SUP adventures on day trips to Muskoka and Georgian Bay (with picnics along the way!)

On Georgian Bay - near Nobel, Ontario
Enjoying a yummy summer salad near Port Carling, Ontario
Hmmmm.  Well, looking back on it now, I suppose I have very little to complain about - seems that however short it may have felt, or despite the fact that I worked through most of it, I managed to find the free time to enjoy quite a few awesome experiences this summer.  One of THE most lovely experiences was having the invitation to visit my good friend Lynn at her cottage in Muskoka, Ontario - not once, but twice this year. Once when she and her family were there - always such a fun time spent with friends, enjoying the beautiful surroundings and socializing - and as if that weren't enough, Lynn was kind enough to offer her cottage to us on a weekend when she and her family weren't able to use it themselves.  I'm a lucky girl indeed to have such a friend - yet another thing to be very grateful for - she's as true blue as they come.  :)  A few shots from our time spent there:

I actually got to FINISH a book! (And this particular one was a great summer read)
Fill 'er up! 

Morning Mist
Sunset paddle on the Severn River, Muskoka, Ontario
Okay, so to those of you who tuned in here because you thought you saw something about a recipe for a frittata - thanks for hangin' in with me as I took a little trip down a summer memory lane.  As promised - there IS a recipe as a small reward for indulging me! :)

One of the pleasures of cottage life is cottage cuisine - everything just seems to taste better when you're up north - and of course, there's more time to experiment with different foods and flavours.  Cooking becomes a pleasure, not a chore - whether it's for a crowd or just for yourself.  You also discover how to whip up something out of nothing, especially if you're a distance from the nearest grocery store - and one of my favourite dishes to do that with is the simple frittata.  The beauty of it is that there really are no rules - you can add as little or as much to it as you like.  During our stay at Lynn's, one morning for breakfast, I used leftovers from the prior evening's dinner - salmon and asparagus - then added mushrooms, red onion, and tomatoes.  The result was a most delicious blend of savoury flavours - perfect for a breakfast outdoors in the morning sun!  So without further ado:


Summer's End Leftover Frittata 
Serves 4-6 

Ingredients

1-2 tbsp. of olive or butter
1 c. sliced mushrooms
1/2 c. red onion, roughly diced
1 large tomato, roughly chopped (seeding is optional)
1/2 bunch fresh asparagus, blanched
1 lb. fresh cooked salmon (preferably drizzled first with lemon juice, then grilled or baked to taste)
6 eggs
1/4 c. low fat milk (optional)
Salt & pepper to taste

Instructions
  • Preheat oven to 400°
  • Heat oil or butter in an oven-ready skillet over medium high heat.
  • Add mushrooms, red onion, tomato, asparagus, and salmon to skillet; sauté until all ingredients are tender.  
  • Beat eggs together in large mixing bowl with milk, salt, and pepper until frothy. 
  • Add egg mixture to ingredients in skillet, stir to mix evenly. 
  • Cook egg mixture on medium high just until eggs start to set (about 2-3 minutes)
  • Transfer skillet from stovetop to oven; bake for 8-10 minutes, until eggs are set, "puffy", and slightly browned. 
Enjoy!  And remember - if you can dream it, you can do it - you can add whatever strikes your fancy to a frittata (just as long as you remember to always add the eggs!) - it's a great dish to experiment with (and not just for breakfast! Makes a lovely brunch or light dinner too).  :) 

I hope y'all (apparently I'm from Texas now!?) had an AMAZING summer, however you happened to spend it.  It's a tough thing to let go of, but... "to every season, turn, turn, turn..." 

Saturday, July 12, 2014

easy like saturday morning {banana muffin recipe}


I'm back!  Did you miss me? ;-)

Anyway, I've got a bunch of things I'd love to write about all of a sudden, so I'll start with this, and see how far I get.  First up - another recipe!

This is an adaptation of an old family favourite recipe that we've made more times that I can count, for banana muffins.  The original recipe comes from a book that's probably tucked away on everyone's recipe bookshelf (well, at least everyone in Canada?), called "Muffin Mania", by Cathy Prange and Joan Pauli - anyone recognize this?


It dates originally from 1982 - and honestly, I don't think I've ever made a recipe other than the banana muffins - because they were THAT good.  So when I looked at my fruit stash today and saw three large overripe bananas, I knew the time had come to turn them into muffins, before the fruit flies  swooped in and claimed them for their own.

I guess it's been a while since I made these babies, because I was somewhat astonished at the original ingredient list - wow - 3/4 cup of white sugar!? :(  The time had come to modify this recipe, hopefully not at the expense of the goodness of these little treasures - and I'm happy to say, I believe I rose to the challenge! Here's my own 2014 version of the "Best Ever Banana Muffins" - with thanks to the original authors for their inspiration.  Just keep in mind, even with healthier ingredients, these are still treats!  Depending on how many people are in your household, I would freeze any extra muffins before you're tempted to eat them all! :)

Even Better Banana Muffins 
Makes 12 muffins

Ingredients

3 large overripe bananas
1/4 cup organic cane sugar
1/4 cup sucanat
1/4 cup pure maple syrup
1 egg
1/3 cup coconut oil, melted
1 tsp. baking soda
1 tsp. baking powder
1/2 tsp. salt
1/2 cup brown rice flour
1/2 cup buckwheat flour
1/2 cup organic all purpose flour (I don't eat 100% gluten free - feel free to substitute another gluten free flour of choice here)
1/2 cup pecan pieces (optional)
Walnut pieces for garnish (optional)

Instructions

Heat oven to 375°

Mash bananas:


Add sugars, maple syrup, and a slightly beaten egg:


Add the melted coconut oil, and mix all wet ingredients together:


In a separate bowl, mix the dry ingredients together (flours, baking soda, baking powder, salt), and then add to bowl with the wet ingredient mixture, and mix together.  Sorry, for some reason I failed to take a photo of that step - but I did manage to snap a pic of my salt of choice lately - Himalayan pink salt (a bargain for under $5.00 at Costco!):


Himalayan pink salt is an unprocessed salt, which not only beautifully enhances flavours, but is also rich in mineral content (as opposed to the processed white table salt, which can actually have added sugar in it!)

Finally, add your nuts (if using) to the mixture, transfer to muffin tin, and pop into the oven:


And 20 minutes later....voila!


Then came the test - could these muffins maintain their moist, flavourful, density without a host of processed ingredients??

I think (hope?) the answer lies in the following photo:


Okay, I know it's not possible to taste the flavour or consistency of food via photos (YET), but hopefully, this photo illustrates just how delicious these muffins were.  Every bit as yummy as the original recipe.  Is there anything better than fresh muffins, hot out of the oven, with a dollop of REAL butter on them? :)  Throw in a glass of fresh squeezed O.J., and you've got just about the perfect Saturday morning breakfast.  But since this recipe makes 12 muffins - you've got one for every day of the week (and more!)

Enjoy!


Tuesday, June 24, 2014

'tis a gift to be simple {pesto pizza recipe}


Well, I'm telling you, this blogging thing really does have a life of its own.  One second I'm feeling guilty for not posting enough, the next, the posts just seem to materialize out of thin air, for no rhyme or reason.  Case in point - ever since I read Meghan Telpner's "Pizza night" post a few days ago, about the virtues of making your own simple version of a pesto pizza, I've been CRAVING just that - with a capital C!

For some reason, kale & walnut was the pesto of choice that I was craving.  I have no idea why that combo seemed appealing to me - perhaps it was simply because I happened to have those ingredients on hand.  Which, dear friends, is exactly the point, right?  Simplicity.

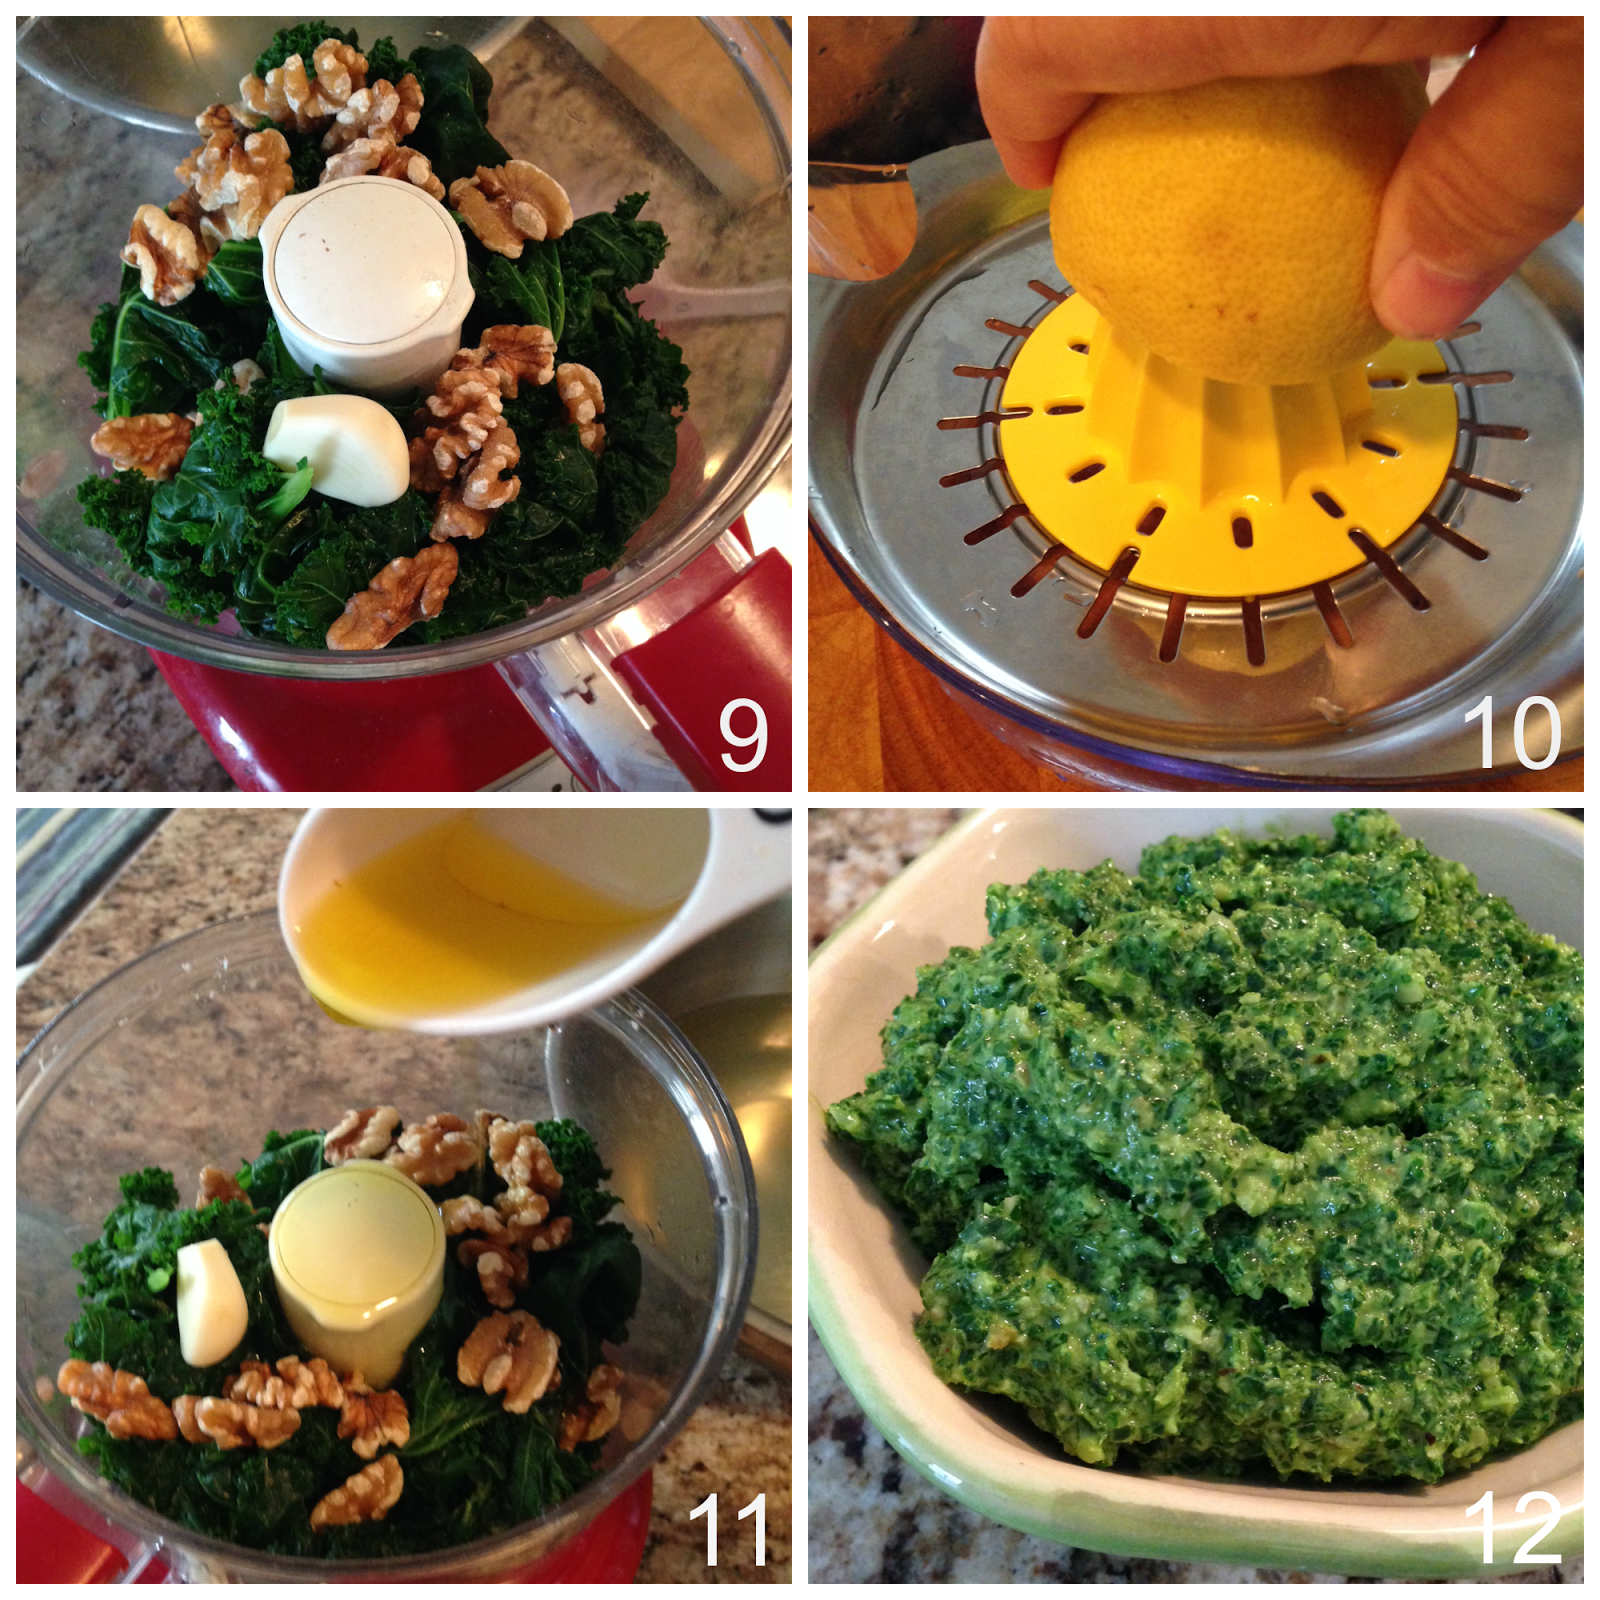
I probably could have whipped up a pesto on my own, but because I was in a lazy mood and didn't feel like experimenting tonight, I googled on up "kale walnut pesto", and found exactly what I was looking for at Love & Lemons.  So before I go any further, let's give credit where credit is due - thank you once again Meghan, for being a never-ending source of inspiration, and thank you, Jeanine, at Love & Lemons, for your gorgeous website.  I will definitely be back when I have a bit more time to ogle all your beautiful recipes!  Please take a moment to follow the above links back to the full recipes from both Meghan and Jeanine - but just because I was in the mood to take pics, here's a little step-by-step pictorial essay on how and what I prepared and ate for dinner tonight. Sorry, they're all iPhone-d this time! Remember - simple is the key word here! :)

1.  Using 4-6 smallish kale leaves, I removed the heavier part of the stems.
2.  Boil some lightly salted water.
3.  Don't forget to put the lid on!  The water will boil faster. :)
4.  Add kale to boiling water to blanch for 30 seconds.  (Why was I thinking of lobster here?)


5.  Prepare ice water bath for kale.
6.  Remove poor kale from boiling water and plunge into icy cold water.
7.  To add insult to injury, squeeze the living daylights out of the kale, which is now in shock.
8.  Absolve yourself by tucking the kale into a nice cozy tea towel, and giving it a nice loving pat. :)


9.  Add kale, 1/4 c. walnuts, 1/2 to 1 clove of garlic (I used 1 clove because I am a garlic fiend) to food processor.
10.  Juice one whole fresh lemon, add to processor.  I didn't bother with the lemon zest - just not in a zesty mood tonight.  (i.e. I didn't feel like cleaning my zesting tool).
11.  I opted to include 1/4 c. of olive oil, along with salt and pepper to taste.  Then hit that process button, aaaaaaannnnddd...
12.  Voila!!  It was all worth it!  The kale lives again in a gorgeous kale & walnut pesto!!  :)


From this point forward, it's all about the pizza - preheat oven to 350°, and line a baking sheet with parchment paper.  Spread pesto on tortilla or flatbread of choice, and add desired toppings.  You don't really need to add any toppings, but since cherry tomatoes are at their candy-sweet best right now, I sliced a bunch of those babies up and added them to my pizza:


Mmmmm, mmmm, mmmm.  I didn't really need to bake it at this point - but I resisted - and popped those beauties into the oven for 20-30 minutes (okay, let's call it 25 minutes):


Oh BOY, I wish you could have smelled how GOOD they smelled as they were baking!  You'll just have to take my word for it.  Or try it yourself, of course. :)

And by the time my kitchen cleanup was done, it was all ready to eat:


Or should I say THEY were all ready to eat - no guilt here, I ate them both. :) Perhaps the "after" pic isn't quite as colourful and pretty as the before - but OMG, it was DEElicious - the tortilla crisped up to a  perfect crunch, the flavour of the tomatoes was rich and, well, tomatoey, and the pesto was simply perfect!

So there you have it.  Writing a blog post wasn't at all what I had originally planned for this quiet rainy summer evening at home, but sometimes these things just have a way of writing themselves.

Thanks for stopping by, and thanks again to Meghan Telpner and Love and Lemons for your inspiration and recipes!